What are Positions?
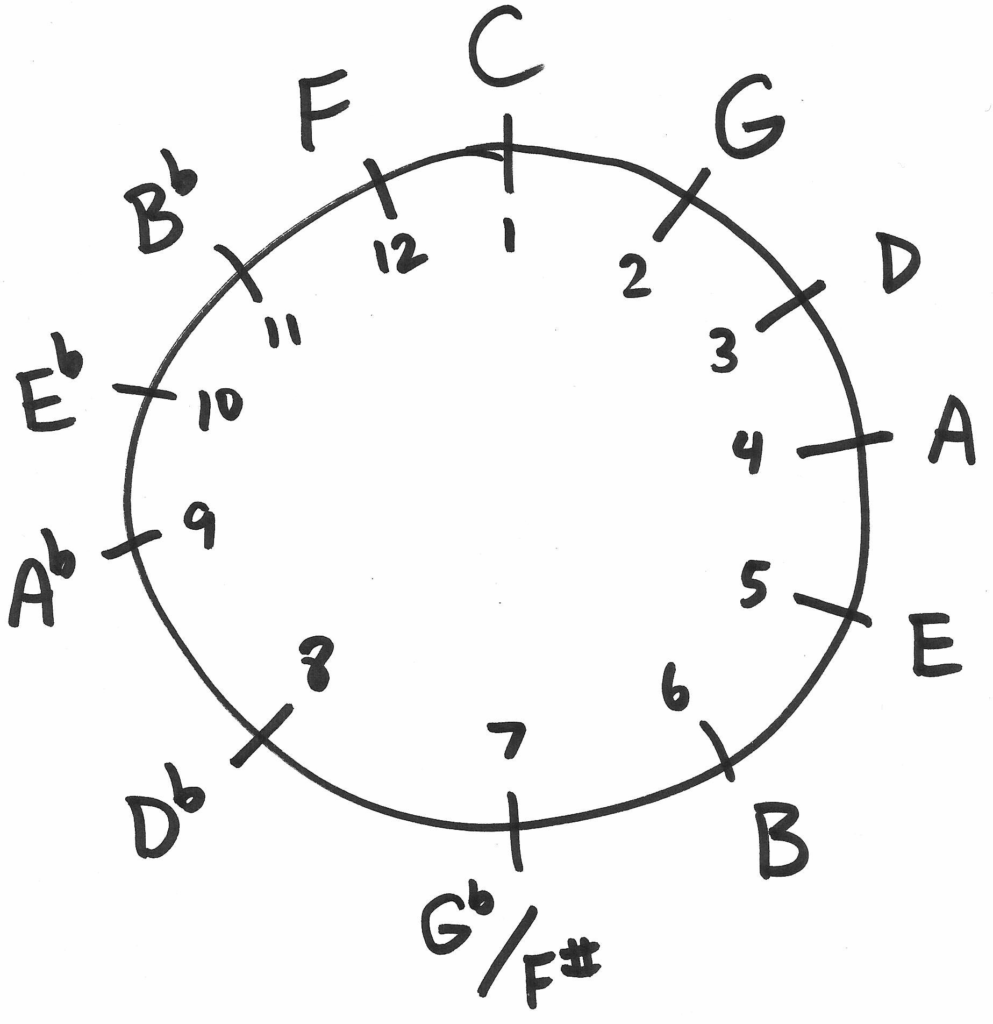
“Position” on the harmonica refers to what key you’re playing in. Turns out, you can actually play in more than one key on the same diatonic harmonica! Positions are numbered according to the Circle of 5ths.
Cross Harp and Straight Harp are Positions
You’ll start to get the position concept if you think about the difference between straight harp and cross harp. In cross harp, home base is the 2 draw. In straight harp, home base is the 4 blow. When you choose to play something in cross harp vs. straight harp, you’re actually choosing to play in different keys, which we’re calling “positions.” Straight harp is 1st position, which is key of C on a C harp. Cross harp is 2nd position, which is key of G on a C harp. Positions allow you to play in multiple keys on the same harmonica.
Transferable Scale Patterns
On the other hand, positions also allow you to play the same stuff on different-key harps. If you learn to play a scale or a lick on one harp, you can switch to a different-key harp and it still works. It’ll just sound relatively lower or higher. The position system allows you to switch harps easily without having to relearn the location of every note on a new harp. Anything you learn on one harp is transferable to another harp, and if you study the key relationships and learn what each position is good for, you’ll know in advance what kinds of sounds you’re going to make.
Positions on a C Harp
1st Position – C
2nd Position – G
3rd Position – D
4th Position – A
5th Position – E
6th Position – B
7th Position – F# / Gb
8th Position – C# / Db
9th Position – G# / Ab
10th Position – D# / Eb
11th Position – A# / Bb
12th Position – F
What Do They Sound Like?
1st Position – major in the middle, blues up high
2nd Position – blues down low, major up high
3rd Position – minor
4th Position – minor
5th Position – minor
6th Position – minor
7, 8, 9, 10 Position – challenging, multiple uses
11th, 12th Position – major
Taps in Three Positions – No Bends Required!
1st Position (C on a C harp)
3 3 4       3 4 5

3 4 5       3 4 5       3 4 5

4 5 6       5 4 3

3 3 4
2nd Position (G on a C harp)
-1 -1 -2      -1 -2 -3

-1 -2 -3      -1 -2 -3      -1 -2 -3

-2 -3 -4      -3 -2 -1

-1 -1 -2
12th Position (F on a C harp)
4 4 -5       4 -5 -6

4 -5 -6      4 -5 -6      4 -5 -6

-5 -6 7     -6 -5 4

4 4 -5
The “Flat” Positions
As a footnote, Howard Levy has an alternative nickname for 12th position – he calls it “first flat position,” since when you play a major scale there on a C harp, it features one flat in its key signature. He calls 11th position “second flat position” for the same reason, since there are two flats in 11th when you play a major scale there. This way of thinking about the counter-clockwise positions has been helpful to me. On a gut level, I’d suspected that the higher-numbered positions must be harder, somehow. But just the opposite is true – basically, the closer you are to 1st position, the easier the positions tend to be, whether you’re traveling left or right from the top.